Many Users find issues while starting AME Development.
This Post is will try to address those and setup the initial AME.
1. Login as SYSADMIN user..
2. Create a New user account(Or you can use existing User Account) and give an appropriate effective date. Do NOT add any Approval
responsibility.
3. Save the record.


5. Query for the newly created user.
6. Click on the update action from the result table.


8. Change the “Search By” field from “Roles and Responsibilities” to “Roles”
9. In the search window, query for Approval%
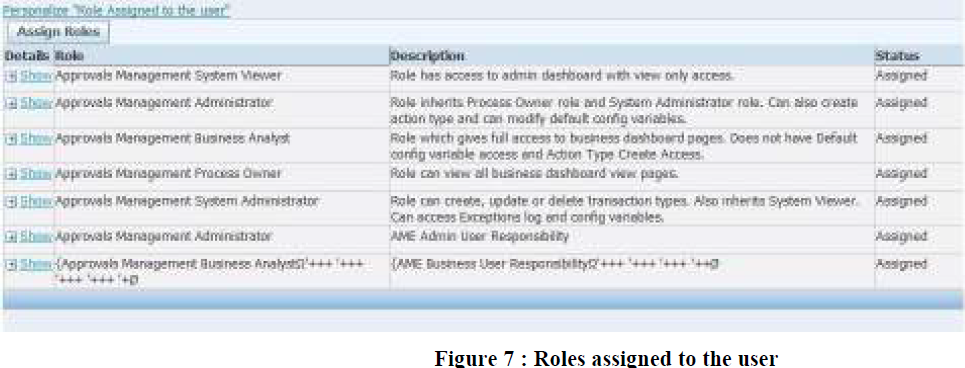
10. Following five roles will be displayed.
11. Select only the “Approvals Management Administrator” and “Approvals Management Business
Analyst” roles.


13. After completing the action, you can query back the same user and can verify the list of roles being
attached to the user.
14. Now switch the responsibility to Functional Administrator.
15. Click on create grants under the grants sub-tab.

16. Enter a Grant Name and provide an effective date.
17. Navigate to the security Context region and select the Grantee Type as ‘Specific User’
18. In the Grantee field select the newly created User
19. In the Data Security region select ‘AME Transaction Types’ as the Object.

20. Clicking Next will take you to the ‘Select Object Data Context’ page’.
21. You have a default value of ‘All Rows’ in the Data Context Type, leave it as it is, and navigate further.

22. In the ‘Object parameter and Select Set’ page, enter ‘AME calling applications’ as the value in the Set field.

23. Clicking Next will take you to the Review page.
24. Verify the information and submit the transaction.
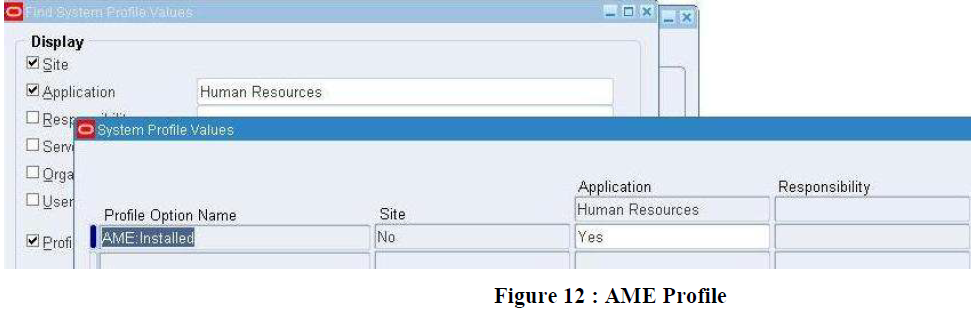
25. Now Switch the responsibility to System Adminstrator and Navigate to System Profiles.
26. Query for the profile ‘AME:Installed’ at the required level and set the value to ‘Yes’.
27. Save the data.
28. Now you can login as the newly created user.
29. You should be able to see the following responsibilities:
a. Approvals Management Administrator
b. Approvals Management Business Analyst

No comments:
Post a Comment